FAIRYTALE COOKIES OF NEW YORK

Christmas time always makes me think of New York.......and whatever else might be said adoringly or disparagingly about it, the city knows how to put on a hell of a charming holiday season. Festive twinkling lights reflected in damp streets, rosy-cheeked faces smiling in puffy coats, giant garlands and enormous high-rise Christmas trees, carols wafting around in the air from street performers on trumpet and sax...it's a giant rock & roll neon-lit Nutcracker in a snowglobe, and it's perhaps the only season I truly miss in NYC. Thinking of the city is what led me to these chocolate-dipped meringue cookies, as well. A riff on that classic deli staple, the Black & White Cookie, they're a lighter-than air version that I like to say is what a Black & White would be like if those cookies were actually tasty (in reality, they're usually pretty spongy and disappointing).

A crisp, sugary vanilla meringue cloud dipped in dark chocolate and sprinkled with a little extra holiday pixie dust in the form of crushed candy canes, these Black & Whites never disappoint. They couldn't be easier to throw together, but they're no last-minute cookie, so make sure you leave plenty of time for that long, slow bake in a warm oven. There are two things you can't hurry, after all: love...and meringues. But these, I swear to you, are worth the wait, and they'll make any holiday gathering merry & bright!

Black & White Meringue Cookies

Makes about two dozen cookies

3 egg whites

3/4 cup granulated sugar

pinch of salt

1/8 teaspoon cream of tartar

1 teaspoon vanilla

3.5 oz. dark chocolate (I use a bar of my favorite 70% dark)

1 candy cane

Preheat oven to 200 degrees, and line two baking sheets with parchment paper. Begin beating egg whites until foamy, either by hand or in an electric mixer, add sugar and continue beating. Add salt, cream of tartar and vanilla, continue beating for about five minutes or until meringue is glossy and holds stiff peaks.

Place generous spoonfuls of meringue onto parchment (about two tablespoons per cookie), swirl into roughly cookie-shaped objects, but remember that slight imperfections in meringue can make everything a little more beautiful. Bake for 2 hours at 200 degrees; meringues are done when the outside is dry to the touch and they can be easily lifted from the parchment. Remove and let cool thoroughly.

Unwrap candy cane, place in plastic bag and gently crush into pieces with the bottom of a coffee cup. Break or chop chocolate into small pieces. In a small microwave-proof bowl, place 2/3 of chocolate and microwave 20 seconds at a time until fully melted. Stir in remaining chocolate pieces, keep stirring until mixture is fully melted. Dip each meringue halfway into chocolate, then place on parchment to set. While chocolate is still shiny, sprinkle candy cane pieces over each one. Repeat until done, let set fully, then enjoy!

CHOCOLATE BLACKBERRY BREAD

Some foods are just indisputably meant to be together, like peanut butter and jelly, like biscuits and gravy, like sweet corn and basil. But chocolate and blackberry? I never knew it before, but they're one of those classic combinations. Chocolate and blackberry are

married

, y'all.

There something magical about the combination of the deeply flavored, sweet berries playing against the tart, floral notes in intensely dark chocolate. I've made a thousand chocolate cakes before this one, and yet somehow there I was, combining these flavors for the first time. Swirling fresh blackberries into chocolate cake batter allows the two to combine and become something

more

than either flavor once baked, for lack of a better descriptive word. Just

more

. More like the ripe taste of late summer on your tongue. More chocolatey, somehow. More grownup, maybe, although it's one of those 'sophisticated' tastes that I suspect everyone will actually love. Tossing some whole berries into the batter as well allows for surprising little pockets of fruit that pop up in each bite, silky and jamlike and addictive. The whole thing is a wonder, really. I was lucky enough to make it just before blackberry season ended for the summer, and while I'm sure fresh is best, I have a suspicion that you could make this with frozen berries all winter long and bliss out on chocolate blackberry perfection just fine.

There's been a lot of extra love floating around in my world the last few months, a record-setting number of engagements and milestones and generally wonderful things. So why not chocolate and blackberries, after all? In a few hours from now, I'll be jumping on a plane to the opposite coast to watch two dear friends marry each other, and I couldn't be more excited--or more convinced that this cake is the perfect metaphor for all things matrimonial. Two main ingredients that compliment one another, each sharpening the flavor of the other as they join to become something greater in the pan than they were in the bowl? Sounds about right to me. Here's to love! Here's to perfect matches! And here's to chocolate's perfect match, the blackberry. Now, let's have some cake*.

[ *Yes, I know, I keep referring to this as a

cake

when it's clearly titled Chocolate Blackberry Bread in the recipe. But come on. We all know this is a 'bread' in the same way that zucchini bread is a bread....which is to say that it isn't at all. Mazel tov, have a slice of cake already! ]

Chocolate Blackberry Bread

Makes one 9" x 4" loaf

small amount of butter or coconut oil for pan

1 1/2 cups all-purpose flour

1 cup granulated sugar

1/2 cup cocoa powder

1 teaspoon baking soda

1/2 teaspoon salt

1/3 cup coconut oil

3/4 cup Greek yogurt

1/2 cup milk

6 oz fresh blackberries

4 ounces dark chocolate

Preheat oven to 350, and lightly butter or apply oil to the sides of a 9" x 4" loaf pan. In a large mixing bowl, sift together flour, sugar, cocoa powder, baking powder and salt. In a separate bowl, combine coconut oil, yogurt and milk. Take half of the blackberries and puree in a food processor (you can also just smush them up a bit with a fork, if you prefer a more rustic texture or if you don't happen to have a food processor), add pureed blackberries to liquid mixture. Make a well in the center of the dry mixture and pour liquid into it, mixing as you go until it combines into a thick batter.

Separate the chocolate into two piles and chop half of it into small pieces (about the size of chocolate chips). Fold remaining whole blackberries and chopped chocolate into batter, then pour into pan and place in oven. Bake for at least 65 minutes, testing with a knife or skewer after an hour (you may need a little longer depending on your oven; mine needed about 75 minutes). Bread is done when a knife can be inserted and removed cleanly. Take out of oven and let cool.

Melt remaining chocolate in a small, microwave-safe bowl, stirring until smooth. Drizzle over room temperature Chocolate Blackberry Bread, then serve.

STRAWBERRY FEELS FOREVER


Two magical little words for you today, my friends.......strawberry season.

Just saying the words gives me a little strawberry-perfumed sigh of satisfaction. These plump, juicy little red mouthfuls are a favorite of mine from way back in childhood, and always conjure up a series of lazy summertime afternoon feelings. When challenged to come up with a dessert that matched perfectly with a Fourth of July-themed picnic, my first and only thought was STRAWBERRIES. Seeing as July fourth falls smack in the middle of their ripe season, it's perfect timing, and I think you'll love the simplicity of this rustic tart. A shortbread cookie-inspired, press-in crust is the easiest pastry base in the world to make, and the buttery pastry meets its perfect match when topped with a thin layer of rich mascarpone and thinly sliced sweet-tart berries.


The little hints of white that peek through the layers of cheery, bright red strawberry are subtly patriotic enough for any July fourth picnic, and if you're looking for a flag-inspired dessert that gets its lovely hues from nature (rather than vats of red--and worse, blue--dye), this is the treat for you. Happy Fourth of July!


Strawberry Mascarpone Tart

Makes one 9" tart

For the tart base:

4 tablespoons unsalted butter, softened
3 tablespoons sugar
1 large egg yolk
1 cup flour
1 teaspoon salt

For the tart topping:

1 cup mascarpone
1 tablespoon lemon zest
1 tablespoon fresh lemon juice
1/3 cup sugar
1 1/2 cups sliced strawberries
2 tablespoons honey

Preheat oven to 375 degrees. Stir together butter and sugar in a medium bowl, then stir in egg yolk. Add flour and salt, and stir until the mixture is dry and crumbly. Press dough into bottom and up the sides of a 9-inch tart pan. Place in freezer until firm, about 20 minutes. Bake, rotating halfway through, just until the tart base turns lightly golden brown, about 20 minutes. Remove pan and let tart base cool in pan.

In a mixing bowl, combine mascarpone (I like to use Vermont Creamery), lemon zest, lemon juice and sugar. Spread mixture on completely cooled tart base with a pastry spatula or butter knife. In another bowl, toss strawberries with honey, then arrange in whatever pattern you like on top of the tart. Slice, share and enjoy!


BOWLS OF CHERRIES


Yes, I pitted each and every single one of these cherries myself...with a knitting needle, in fact (the simple reason for which is that I do a lot more knitting then I do cherry pitting, so guess which pointy metal object is more readily available around my house?). It is, I believe, a thing that everyone should sit down and do at least once per cherry season. The rest of the year, you can pull your bag of frosty, pre-pitted cherries from the freezer like everyone else--totally admit to this habit myself--whenever you're in need of a homemade cherry pie, cherry syrup, muffins, an addition to a smoothie. 

But promise me this. 

Promise me that at least once a year, you'll sit down with a bowl of these beauties and work through the meditative act of poking each stone through the fruit by hand, one at a time. And as you pit each stubborn little devil, try to really think about the work itself. Think about how many deft fingertips had to pluck and pluck and pluck to fill this bowl full of juicy red fruits. Think about how many cherries had to first be carefully pitted to create each mouthful of cherry pie you've ever devoured, streaked with marbled scarlet-and-pink swirls of melting vanilla cream. Silently thank every cherry pie baker you've ever known, for their perseverance, for their deeply stained fingertips, for their dexterous way with a cherry pitter or a sharp knitting needle. 


And then do whatever you can to prolong cherry season, and to make the most of each single cherry you hand-pitted for someone's pleasure. If you're looking for suggestions, I'd suggest this recipe for pickled cherries. They're sweet, tart, with a faint background of salt, caramelly tones from brown sugar, nuanced notes of allspice, clove and pepper. These would be equally at home on a cheese plate, a kale salad spiked with goat cheese, or even a tender pulled pork sandwich.


Sweet & Tart Pickled Cherries

Makes about one quart

1 cup water
1/3 cup light brown sugar
1 tablespoon salt
1/2 teaspoon ground allspice
small handful of whole black peppercorns (around 20)
whole cloves (also about 20)
1/2 cup white vinegar
4 cups fresh sweet cherries, pitted

Place water, sugar, salt and spices in a small saucepan, heat just to boiling then remove from heat. Stir until sugar and salt are dissolved, let mixture steep for about five minutes. Add vinegar and cherries to mixture.

Let cool completely, then place in airtight container (note: leave whole spices in with the cherries & pickling brine, as they will continue to flavor the mixture. Just be careful to leave them behind when you remove the cherries for eating!) and refrigerate. Enjoy on everything from cheese plates to savory sandwiches within three weeks of pickling. Happy summer, cherry pitters!


ON SOFTNESS, ON COURAGE, ON COCONUT RICE PUDDING WITH FRESH MANGOES


I'm going to talk about rice pudding in a second, I swear to you. I'm talking about a velvety rich concoction that clings to the spoon in that most voluptuous of ways, topped with ripe mango slices and a drizzle of magical caramel sauce (more on the magic of that later), finished with a showering of pistachios. But you're going to have to hang in there for a moment, because I recently had a birthday, and as the occupant of a possibly-gracefully-possibly-not aging human body.......something else has been on my mind a lot lately.


Tell me about vulnerability, says one half of me, as though I were two separate people, each turning to the other.

I'm standing over the stove and poking the surface of a rice pudding at the time, stirring whole grains as they melt into a creamy mixture, and if I'm startled by this sudden self-address I'd like to think I am too cool to show it. This is how people lose their minds, isn't it?

I prod the grains of rice in coconut milk for a moment longer, thinking about how to answer myself. Softness. Let's talk about softness, shall we? We so often speak of strength as hardness, she's steely or he's made of stone, as though simple hardness were the thing to be prized. But hardness resists experience, rejects knowledge. Things glance right off the surface of a steely, hard thing, colliding and gliding away into the ether without leaving so much as a scratch. True, the next movement in your direction could, say, be a knife sneaking into the velvety hidden, mortal place between your ribs, or it could be an innocent spoon nudging into the silken depths of a warm bowl of rice pudding.


Still I can't help but wonder.......is that, really, all there is to all this? To harden up and evade life's every experience, unscratched? Believe me, one half of me says to the other, you've known people like this. And so have I. Is that really all that we're here to do, to escape and remain unchanged and unlearned and eternally youthful and unblemished, only to die one day without ever having really lived? What a blatant waste of a lifetime on earth.

No thanks.

Far more courageous, I think, to turn and face the knife--or the stirring spoon, as it may turn out--and not grow yourself an outward shell to deflect the blow; to remain soft, yielding, open to experience. It takes a strength far greater than simple steeliness to accept life's blows and to absorb them, allowing the resulting dings and scrapes and even gouges to become part of our personal landscape. Press up against life--yes, okay, in a way like warm rice pudding, surging upwards above a spoon or pressing silkily into the roof of your mouth--and let its other people, atmospheres and events leave impressions; some will linger, and some will fade. I scrape my battered wooden spoon against the bottom of the pot again and again, leaving loops and whorls that fill with creamy deliciousness as they collapse. My rice pudding is nearly done.


Tell me again about the teacups, then, says the skeptical half of me to the resilient half, not yet satisfied with my answer. About the teacups? I say that there are wiser cultures than our own that value an object more as it sees daily wear--the wabi-sabi nature of an heirloom cup, the glorious warm-to-the-touch tarnish on a piece of antique copper, the rich, rubbed softness of a piece of vintage velvet--and how it grows in beauty and usefulness as it's touched and scratched and tarnished along the way. I talk about the teacups whose glaze literally takes on different colors as years and years of repeated pourings of hot water and ceremonially sipped tea transform what was into what will be. It's supposed to add to their beauty, not detract from it, and I like that idea--as the occupant of a human body myself. People ought to cherish themselves, body and soul, in the same way. Shouldn't we? We change, we grow, we twist into ribbons, we bloom and reshape, we transform into extraordinary things, and finally, we die. One day. If we haven't let circumstances leave impressions on us along the way, then we've missed the whole point.


My second self is satisfied, silent.

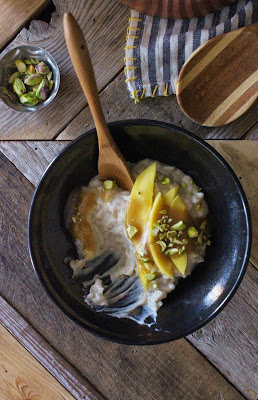
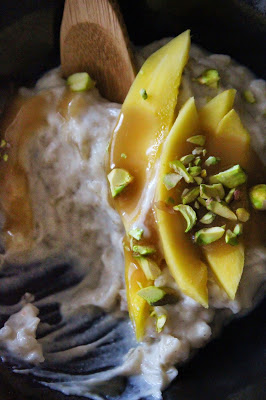
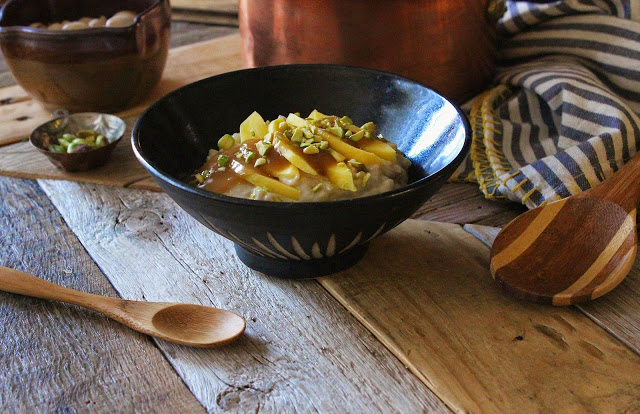
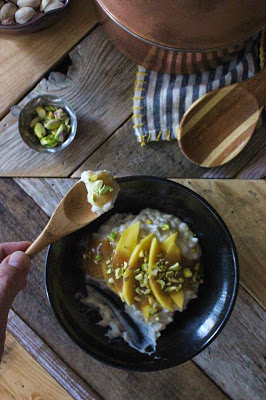
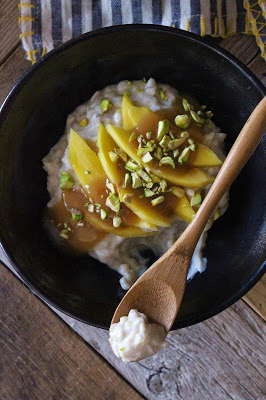
I serve us each a portion of coconut milk rice pudding, heaped softly in a bowl under a fan of thinly sliced ripe mangoes, a drizzle of coconut dulce de leche and a small handful of pistachios. The rice pudding steams fragrantly upwards into our faces as we dip spoons again and again into the soft surface of the rice, not a word passing between us until it's all gone and we're silently scraping the sides of bowls.

Coconut Milk Rice Pudding with Mango & Pistachios

Serves 4 (depending on how well you tend to share)

This is, obviously, a rich creamy treat for anyone who's looking to take dairy out of their dessert routine without sacrificing flavor. It's still pretty decadent, but it's loaded with healthy plant-based fats from the coconut milk and pistachios. And a fanned-out spread of ripe, delicious mangoes on top adds just enough tart sunshine brightness to what is otherwise a bowl of soft, sweet, addictively spoonable goodness.

I've made several different versions of this in the past, including a variety that used brown rice for its nutty crunch and was a loose spin-off of this Mark Bittman recipe. In the end, though, I settled on arborio rice, the grain used to make traditional risotto, as much for the intercontinental vibe of this recipe as for its creamy texture. The grains swell up and become plump but still just toothsome enough, suspended in a thick and rich coconut pudding.


2 14 oz. cans of coconut milk (buy the best quality you can find, and use the full fat version, please)
4 tablespoons brown sugar or coconut sugar
1/2 teaspoon salt
1/2 teaspoon ground cardamom
1/2 cup arborio rice

Optional (but recommended) toppings
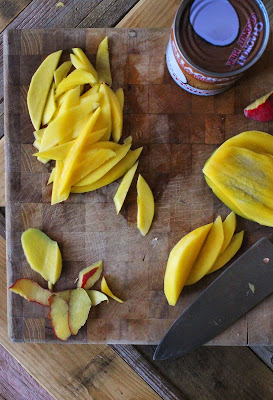
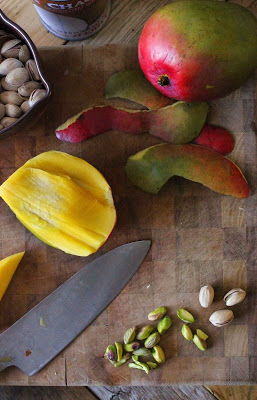
Fresh mango slices
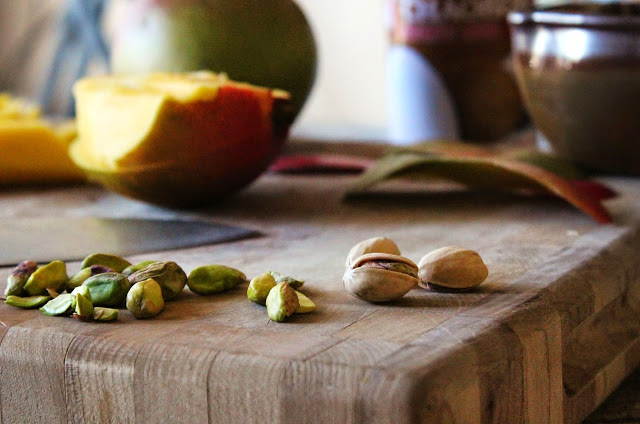
Chopped roasted pistachios
Coconut dulce de leche (see recipe below)

Pour coconut milk into a heavy-bottomed saucepan, add sugar and stir until dissolved while heating just to a boil. As soon as bubbles begin to break the surface, reduce heat to the low end of medium and keep at a simmer. Add salt, cardamom and rice, stirring well.

Let simmer for about 45 minutes, remembering to check in with your wooden spoon every few minutes--even if you are in the midst of deep, philosophical conversation with your 'other' self--and give it a stir, scraping the bottom to prevent sticking. Rice pudding is finished when it's thick & creamy and rice is tender. Remove from heat and serve slightly warmer than room temperature (although it's a pretty great breakfast eaten cold the next day, as well), topped with fresh mango slices, a drizzle of coconut dulce de leche and pistachios.


Coconut Dulce de Leche

This is a pretty great basic recipe to have up your sleeve in general, as it's suitable for vegan, paleo or dairy-free diets, and is amazing on fruit, cake, ice cream, a spoon........whatever takes your fancy. The 'magic' of this wonderful sauce is that it somehow manages to taste like the most creamy, rich, butterfat-filled version of caramel sauce you ever tasted, while using none of those actual ingredients. In fact, it takes only three ingredients and comes together in less than thirty minutes on your stovetop with minimal effort. MAGIC.

Makes about 2/3 cup

1 14 oz. can of coconut milk (same note as above regarding quality)
1/2 cup brown sugar or coconut sugar
1 teaspoon salt

Combine all ingredients in a medium, heavy-bottomed saucepan (it's not much liquid, but you want to go larger rather than smaller on this, the extra surface area will help the caramel to evaporate and reduce), whisk together over medium heat until sugar and salt have dissolved. Bump the heat up to medium high and boil gently for about 20-25 minutes, stirring often to make sure it doesn't burn, boil over, or generally do anything else unpleasant.

Dulce de leche is done when it has thickened and darkened to a caramelly, nut brown color....yes, I realize this is totally subjective. Just stop it when it looks & tastes good to you. Remove from heat and let cool completely, then drizzle over rice pudding with mango slices. Can be saved in a container with an airtight lid for about three weeks. But it probably won't be around that long. :) 

ON NECESSITIES, CANDIED VIOLETS, AND THE 2015 SAVEUR FOOD BLOG AWARDS

So, I've been thinking a lot lately on the question of necessity.

Really thinking. I mean, I've pondered and tapped thoughtfully on both my forehead and my keyboard and hummed, typed, erased, re-typed (more on the 'why' of that, later). What do we humans really need? The question has a special relevance for someone who loves to create in the kitchen, I think, because really, you know..........why? Do we need to create special meals? Do we really need dessert, a course on the menu which has always been about pleasure and never about sustenance? Could we not just jam raw nutrients directly into our mouths? Sure, we could do that. But I'd argue that we need beautiful cooking just as urgently as we need books, art, poetry and the music of Tom Waits and Leonard Cohen in our lives. Like we need italics in our typing. We just do.

Why am I bringing this up today? The 2015 Saveur Food Blog Award nominations opened up on March 3rd, and I've been thinking about them ever since. I mean, are accolades necessary? We don't need them, I suppose. And yet, we just do. Like the candied violet (and yes, more on the 'how' of that later) on top of a beautiful cake, don't they just they add a shiver of unexpected pleasure here and there? Do I want to win a 2015 Saveur Food Blog Award?

Dear readers, I've gotta admit to you, I very much do.


Do you have thirty seconds to spare? Because that's all the time you'll need to help me out by nominating Sweet Laurel for this award (you don't even need to register to nominate!). Just follow this link and then make your screen look like mine does in the photo above. And thank you! The freshly baked lavender-lemon shortbread cookies are in the mail, I promise. ;)

Why all the thoughtful tapping, typing, erasing, re-typing? Well, I hate to ask. Simple. I don't write to win awards (wouldn't that be a bit like spending years falling in love and getting married just to ultimately get your hands on a blender? A pretty shameful example of totally missing the point along the way), and I don't like to solicit attention unless it's towards a worthy goal. But as a real flesh-and-blood human with a soul and an ego, I'm not going to lie to all of you following along at home......this one matters to me. Saveur is one of the last print publications doing real food journalism, and their sixth annual blog awards are a real-deal Big Event to me. Some of the most well-respected blogs (and favorite daily reads of mine) have been finalists and winners of this same award along the way. I'd be beside myself with happiness and gratitude just to be in their company as a finalist. I'll try not to say too much more on the subject until the results are announced.


As to that nagging question of necessity, there's no real answer, as is true of the best questions in life. There's no question in my mind that we need cooking as a form of self-expression. Likewise, in 2015 there's no question for me that we need food blogs themselves; many of us depend on them even more than cookbooks these days (although of course many of us are still hopelessly addicted to buying cookbooks, as well). But food blogging awards, a necessity? Of course not. They're not the main meal itself, awards are really just the candied violets on top. And that's quite all right with me.


You may remember these particular candied flowers making an appearance in last month's Chocolate-Covered Cherry Cake post, but I thought I just couldn't do these little darlings sufficient justice without a post of their own, so here we go!


Candied Edible Flowers

These make a spectacular topping (almost like edible confetti) for any cake you're particularly proud of, whether it's a show-stopping centerpiece or a pile of darling little cupcakes. Still, don't feel limited to the world of desserts. These little beauties look magically dipped in crystallized fairy dust, and add an otherwordly, 'forest floor' touch to any course on your menu. Try a sprinkling of candied flowers on a mixed green salad, or as an unexpected garnish on a sweet & savory main course like honey-glazed pork tenderloin. Or just try a handful, inserted directly into your mouth! Few things in the culinary world feel stranger and better than eating handfuls of flowers.

Violas*, as shown (make sure they're grown without pesticides, specifically to be eaten)
1 egg white
1/2 teaspoon water
Fine granulated sugar
One small paintbrush (use a brand new synthetic-bristled one for this, you can pick one up at any art or craft supply store for just a few dollars)
Parchment paper

( *Plenty of other flowers, including roses and marigolds, have edible petals that can be candied)

In a small bowl, lightly beat the egg white with the water just until thoroughly combined. The slightly thinner texture created by adding water will make the mixture easier to brush onto the delicate petals.

Leave the stems on your flowers during the sugaring process to use as a handle (they're not edible, so just snip them off once flowers have set). Dip the bristles of your brush in the egg white mixture and gently paint it onto the petals of each flower. Gently. I can't stress that enough. This is an easy task, unless you're impatient or in a hurry, so just, you know......chill. Get into the whole slow, repetitive, satisfyingly crafty nature of completing this task. Just don't rip those petals! 

After you've brushed one flower thoroughly with egg white, hold it over a small plate or saucer and shower it with granulated sugar. Shake off the excess, repeat if necessary until no more sugar will stick. Set flower aside to dry on parchment, repeat with remaining flowers. 

The coating will set on your flowers after a few hours, after which you can gently snip or pinch the stems off and use them to decorate to your heart's content! Your candied blossoms will keep in an airtight container for up to three months, but with all the cupcakes, salads and roasts you'll be decking out in flowers, they're not likely to stick around that long.