PETITE STUFFED PUMPKINS

And I just can't wait until next Halloween

'Cause I've got some new ideas that will really make them scream

And by God, I'm really gonna give it all my might!

- Jack 'The Pumpkin King' Skellington, The Nightmare Before Christmas

I didn't realize it until it was too late this year, but when we chose this house we moved into one of 'those' neighborhoods: Halloweentown. As the first day of October flipped over on our collective calendars, the decorations began to creep out of storage. A black cat here, a twiggy broom there....then suddenly in the last few weeks there was an onslaught of fake cobwebs, giant lawn inflatables, spooky lights and severed heads and all things ghoulish. One house a block away hosted a full-on haunted house, complete with tombstone-strewn front lawn and sound effects. For a neighborhood that had seemed outwardly a bit conservative, it was a real pleasure to discover that my neighbors were.......basically, kind of secret freaks, after all. It was weirdly comforting.

Of course, as I mentioned, we realized it too late this year. Too busy with home renovations, with work, with general life things. No decorations, not even any costumes for us. But next year.....oh my goodness, the thought of next year has me cackling and rubbing my hands with cartoonish glee. And like the Pumpkin King, I've got big plans.

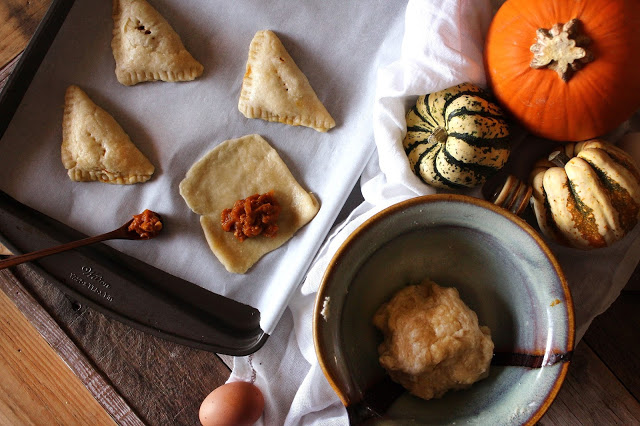
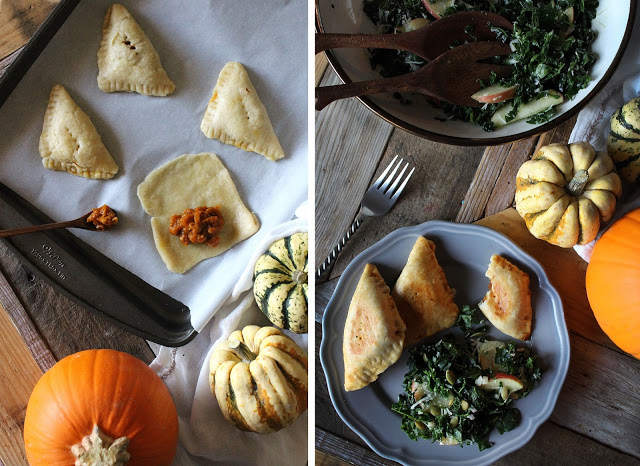
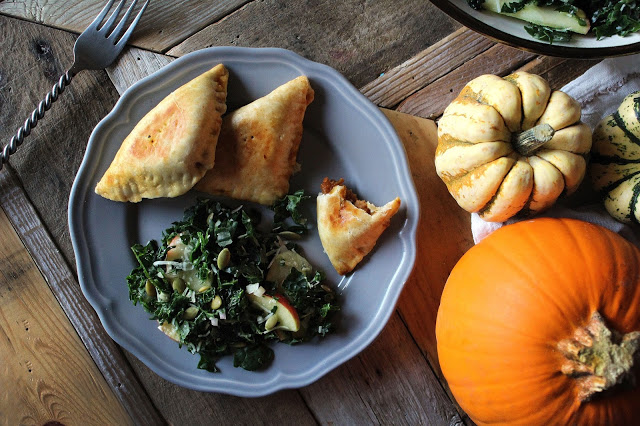
This year, we'll be dining on Halloween candy and I'll be dreaming of these individual stuffed pumpkins I made not long ago. Pumpkin season continues even after the cobwebs have been swept away, so make sure to take advantage of this recipe while you can. It's something of a relative to Dorie Greenspan's famous

Pumpkin Stuffed with Everything Good

recipe, and is basically one of my favorite savory bread pudding recipes stuffed into a pumpkin--the most wonderful, roastable bowl that you can eat afterwards!

Petite Stuffed Pumpkins

3 cups cubed bread (day-old, slightly stale bread is great if you have it)

2/3 cup milk

3 small pumpkins

1/2 lb. mild Italian sausage

1/2 cup diced onion

1 cup sliced crimini or button mushrooms

1/2 cup diced celery

1/2 cup grated parmesan

3 sprigs fresh thyme, stems removed

salt & pepper

In a large mixing bowl, place bread cubes and pour milk over them, set aside. Cut 'lids' into each pumpkin as you would for a jack o'lantern, with a sharp knife. A note on 'small' pumpkins: size is approximate, I had one Sugar Pie pumpkin and two smaller Sweet Dumpling pumpkins (winter squash have

the cutest

produce names

ever

). Scoop out seeds and other stringy bits, discard or set aside for roasting.

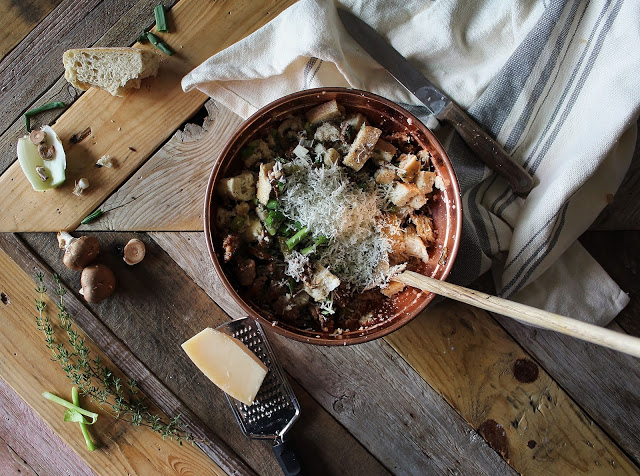
Preheat oven to 350, get out a roasting pan that can hold all three pumpkins at once. Heat a large skillet over medium high heat, saute Italian sausage until about halfway cooked through, breaking it up with a wooden spoon as you go. Add mushrooms, saute until browned, stirring occasionally. Add onion and celery, cooking for several minutes until both are softened and translucent. Transfer mixture mixing bowl with bread and milk, toss to combine. Add parmesan, fresh thyme, and salt & pepper to taste. Mix thoroughly, stuff into pumpkins and place pumpkin caps on top. Roast at 350 for 20 minutes, remove caps and bake for 10 more minutes--at this point they should smell heavenly and be nicely browned on top. Remove and let cool for 10 minutes, then serve while warm.

You can scoop everything out beforehand and serve it that way, but I'm a fan of serving each person their own personal pumpkin. Make sure to scrape the insides of the pumpkin itself while eating from this 'bowl' to get a little of the sweet, creamy pumpkin mixed with the savory stuffing.

PUMPKIN + CHORIZO EMPANADAS

I’m so glad I live in a world where there are Octobers. It would be terrible if we just skipped from September to November, wouldn’t it?

--Anne Shirley, in

Anne of Green Gables

by L.M. Montgomery

Fall is here.....or is it quite yet? October in the desert is always an exercise in waiting, in longing. Staring intently at photos of everyone else enjoying crisp mornings, cozy flannel, freshly picked apples and woodsmoke and steaming lattes (you know the Three-Letter Seasonal Beverage of which I speak) gets a little disorienting when the weather is determined to hang onto endless summer. A tempting breeze ruffles the leaves just outside my window, the light is all golden-tinged and wonderful....but I am not tempted at all. It's one hundred degrees and it's mid-October and I just plain have summer fatigue. Better to stay indoors, gazing adoringly at photos of pumpkins and woodpiles instead, dreaming of November.

We may not be ready for boots and hot apple cider just yet--if ever!--here in the Southwest, but we

can

have our pumpkin spice if I have anything to say about it. Just like last year, I'm

not exactly feeling

that Three-Letter Seasonal Beverage, but I do think the combination of pumpkin and something spicy is a winner. These Pumpkin + Chorizo Empanadas are like perfect little parcels of fall flavor (unladylike admission, you guys? I absolutely love anything that can be picked up and eaten out of hand in a few bites), and they're full of rich, wonderful pumpkin filling with just a hint of smokiness that makes me think of cooler days ahead. Pair this with an earthy, autumnal kale & apple salad in white miso-apple cider vinaigrette (more on that later), and November may as well be here already.

Pumpkin + Chorizo Empanadas

Makes about 12 empanadas

For the dough:

2 cups flour

1 teaspoon salt

1/2 teaspoon baking powder

1/4 cup vegetable oil

ice water

1 egg

For the filling :

1 tablespoon olive oil

1/4 cup diced onion

1/3 lb ground pork chorizo

1 cup pumpkin puree (I used organic canned pumpkin, but you're welcome to roast your own)

1 tablespoon chili powder

1 teaspoon cumin

1 teaspoon smoked paprika

1/2 teaspoon salt

1/2 teaspoon honey

In a mixing bowl, combine flour, salt and baking powder. Add vegetable oil, then sprinkle in ice water a tablespoon at a time until dough reaches a kneadable consistency. Knead only two or three times to form the dough into a bowl, then cover and let rest in fridge for an hour.

Heat olive oil in a skillet over medium heat, saute onion until translucent. Add chorizo and cook until done, stirring frequently. Add pumpkin, chili powder, cumin and paprika, continue stirring for another minute, then remove from heat. Taste and add salt and honey (feel free to adjust these amounts slightly, to taste), then let filling cool thoroughly.

Preheat oven to 350, and line a baking sheet with parchment. Remove dough from fridge, pull small bits (slightly larger than a walnut) off it and roll them out individually into flattened squares approximately 3 inches on each side. Place a small spoonful of filling in the center of each, fold the other side over to form a triangle and crimp edges together with a fork. Beat egg and brush the top of each empanada lightly with the mixture. 

Place baking sheet in oven, bake for 22-25 minutes (flipping once, around the 15-minute mark), or until golden brown. Remove from oven, let cool until just warmer than room temperature (beware of steaming hot pumpkin filling burns!), then serve and enjoy.

CHOCOLATE BLACKBERRY BREAD

Some foods are just indisputably meant to be together, like peanut butter and jelly, like biscuits and gravy, like sweet corn and basil. But chocolate and blackberry? I never knew it before, but they're one of those classic combinations. Chocolate and blackberry are

married

, y'all.

There something magical about the combination of the deeply flavored, sweet berries playing against the tart, floral notes in intensely dark chocolate. I've made a thousand chocolate cakes before this one, and yet somehow there I was, combining these flavors for the first time. Swirling fresh blackberries into chocolate cake batter allows the two to combine and become something

more

than either flavor once baked, for lack of a better descriptive word. Just

more

. More like the ripe taste of late summer on your tongue. More chocolatey, somehow. More grownup, maybe, although it's one of those 'sophisticated' tastes that I suspect everyone will actually love. Tossing some whole berries into the batter as well allows for surprising little pockets of fruit that pop up in each bite, silky and jamlike and addictive. The whole thing is a wonder, really. I was lucky enough to make it just before blackberry season ended for the summer, and while I'm sure fresh is best, I have a suspicion that you could make this with frozen berries all winter long and bliss out on chocolate blackberry perfection just fine.

There's been a lot of extra love floating around in my world the last few months, a record-setting number of engagements and milestones and generally wonderful things. So why not chocolate and blackberries, after all? In a few hours from now, I'll be jumping on a plane to the opposite coast to watch two dear friends marry each other, and I couldn't be more excited--or more convinced that this cake is the perfect metaphor for all things matrimonial. Two main ingredients that compliment one another, each sharpening the flavor of the other as they join to become something greater in the pan than they were in the bowl? Sounds about right to me. Here's to love! Here's to perfect matches! And here's to chocolate's perfect match, the blackberry. Now, let's have some cake*.

[ *Yes, I know, I keep referring to this as a

cake

when it's clearly titled Chocolate Blackberry Bread in the recipe. But come on. We all know this is a 'bread' in the same way that zucchini bread is a bread....which is to say that it isn't at all. Mazel tov, have a slice of cake already! ]

Chocolate Blackberry Bread

Makes one 9" x 4" loaf

small amount of butter or coconut oil for pan

1 1/2 cups all-purpose flour

1 cup granulated sugar

1/2 cup cocoa powder

1 teaspoon baking soda

1/2 teaspoon salt

1/3 cup coconut oil

3/4 cup Greek yogurt

1/2 cup milk

6 oz fresh blackberries

4 ounces dark chocolate

Preheat oven to 350, and lightly butter or apply oil to the sides of a 9" x 4" loaf pan. In a large mixing bowl, sift together flour, sugar, cocoa powder, baking powder and salt. In a separate bowl, combine coconut oil, yogurt and milk. Take half of the blackberries and puree in a food processor (you can also just smush them up a bit with a fork, if you prefer a more rustic texture or if you don't happen to have a food processor), add pureed blackberries to liquid mixture. Make a well in the center of the dry mixture and pour liquid into it, mixing as you go until it combines into a thick batter.

Separate the chocolate into two piles and chop half of it into small pieces (about the size of chocolate chips). Fold remaining whole blackberries and chopped chocolate into batter, then pour into pan and place in oven. Bake for at least 65 minutes, testing with a knife or skewer after an hour (you may need a little longer depending on your oven; mine needed about 75 minutes). Bread is done when a knife can be inserted and removed cleanly. Take out of oven and let cool.

Melt remaining chocolate in a small, microwave-safe bowl, stirring until smooth. Drizzle over room temperature Chocolate Blackberry Bread, then serve.

EATING PEACH GALETTE IN THE WOOD BETWEEN THE WORLDS


Everybody has a secret world inside of them. I mean everybody. All of the people in the whole world, I mean everybody — no matter how dull and boring they are on the outside. Inside them they've all got unimaginable, magnificent, wonderful, stupid, amazing worlds... Not just one world. Hundreds of them. 

Thousands, maybe.

--Neil Gaiman

Lots of good things have been happening lately, not the least of which is this rustic peach galette with sweet almond filling. Work has been humming along, good friends are getting married soon, and we've slowly been taking on the task of transforming our empty shell of a new house into a warm & cozy home. I hope to be able to share all the good things with you here soon, but in the mean time there's this peach pie and a couple of other that I just have to write about.

When I was little, I knew this quote by Neil Gaiman to be completely true, although I didn't actually read the above words until much, much later in life (like, as in last week). It was easy to understand about other, inner worlds, though. Back then I would have called up the image of the Wood Between the Worlds, described in C.S. Lewis's Narnia books as a grassy, warm place interspersed with trees and shallow pools, 'a kind of in-between place.' There were any number of pools leading to any number of strange worlds, and all anyone had to do was choose one and jump in (wearing a magic ring, of course, storybook rules are never as simple as they seem on the surface). My wild and woods-loving child heart loved those Narnia books (back before I knew what a fraught issue that would turn out to be, they were just wonderful stories that thrilled me), and knew something like a Wood Between the Worlds in my own heart. I knew the way to jump with both feet into a magic pool and escaped to other worlds every time I opened a book, every time I drew a picture, or every time I spent an hour glassy-eyed to the world, exploring wildernesses and fantastic beasts inside my own head. There were endless pools in my own personal wood. Thousands, maybe.


I like to think that I have hundreds, maybe thousands, of pie recipes inside me. Unimaginable, magnificent, wonderful, stupid, amazing pies waiting to be given form. This peach galette--a rustic-edged, freeform thing like all good galettes--with a hint of almond filling, this is an especially good one. Served with an extra dollop of late summer on top--fresh basil folded inside pillowy clouds of whipped cream--it's especially good. I almost missed my chance to post about this one, but thank goodness I didn't. It's still summer-warm here, still sunny and hot and buzzy with cicadas. There's still time to eat a peach pie, to slip dreamily off into other worlds for a while. Fall is coming. But for now, it's still summer.

Peach & Almond Galette

For the crust

1 cup all-purpose flour
1 teaspoon sugar
1/4 teaspoon salt
6 tablespoons butter (make sure it's cold first; twenty minutes in the freezer beforehand works well)
1/4 cup ice water
1 egg white
1 teaspoon honey
1/4 cup sliced almonds, for sprinkling

For the filling

1/4 cup finely ground almonds (buy them ground or pulse in food processor at home)
1/2 cup white granulated sugar
1 tablespoon butter, softened
3 ripe peaches, sliced

For the basil whipped cream

1 cup heavy cream
1 tablespoon sugar
2 tablespoons finely chopped fresh basil


In a large bowl, mix together flour, sugar and salt. Pull butter from the freezer and grate it over the large holes of a cheese grater directly into your flour mixture. Mix with fingers until it looks crumbly but butter is evenly distributed. Start sprinkling in ice water a little at a time, continue mixing by hand just until the dough holds together. Use a light touch, and try not to overwork the dough. Lay out some plastic wrap, flatten the dough into a disk on it and wrap it up, refrigerate for at least an hour.

Preheat oven to 375 and line a baking sheet with parchment paper. Remove dough from fridge and place it on a lightly floured surface. Roll out dough into a circle shape, roughly 13" wide and about 1/8" thick. Remember, it doesn't have to be perfect around the edges...you've gotta love galettes for this. Place dough circle onto a baking sheet.

In a small bowl, mix together the ground almonds, sugar and butter until it forms a paste. Spread evenly on the dough circle, top with sliced peaches (I like to make concentric circles with my peaches, because I am fancy). Fold the edges of the dough in roughly overlapping pleats, making sure they overhang the peach slice filling by about 1" all around, pinching pleats as you go. In another bowl, whisk egg white and honey together and brush onto outside of crust with a pastry brush. Sprinkle liberally with sliced almonds.

Bake for about 60 minutes, until the crust is lightly browned and its edges are just caramelized around the edges (you may need more or less time depending on your oven, so trust your senses). Remove from oven, let cool for 20 minutes. Whip cream until it holds soft peaks, then fold in sugar and basil. Serve on top of warm slices of galette, and enjoy your own private summer for a few moments more.


GARLIC CHICKEN PITAS WITH CARROT SALAD & EDAMAME HUMMUS


This sandwich is so much more than a sandwich, you guys. Garlic chicken pitas with carrot salad and edamame hummus (say yes to green hummus!) are most likely magical. Some dishes require a kind of synergy of ingredients to be truly complete, know what I mean? That unearthly shimmer that seems to pass over a dish like the successful casting of a good witch's spell in a fairy tale, the flavors of each ordinary, individual part melding perfectly once they're all together. Pull those ingredients apart, however, and each are........somehow lacking. Refusing to shine. Much less than the sum of its parts. Like a lackluster solo career that never should have been (if there were a sandwich equivalent of Scott Weiland), it's simply more evidence that some partnerships are just not meant to be split up, ever.

This dish, though, guys? Definitely NOT one of those situations. Fantastic together, fantastic apart, whatever the situation calls for....each of the elements of this sandwich is your new mealtime best friend. Allow me to introduce you.


This colorful flatbread sandwich, including tender, citrus-glazed garlic chicken with carrot & feta salad and a generous schmear of edamame hummus is something more like a dream team, composed of only star players. Simple flavors--olive oil, garlic, lemon--repeat again and again like plucked notes against a strain of music, creating a kind of resonant harmony when the layers of this sandwich comes together. Yes, it's that good. But split it apart into three new recipes for your mealtime arsenal, and......it's still that good. These garlic-infused chicken breast slices, for example, could also moonlight as toppings for a hearty kale salad or sit atop a tangle of whole wheat pasta dressed lightly with olive oil and tomatoes. Sweet and earthy carrots play brilliantly off the tart brightness of fresh lemon juice and the salty tang of crumbled feta in a simply assembled carrot salad, one of my favorite side dishes ever. Try this alongside grilled lamb, layered in almost any sandwich, or tossed with leafy greens as a main-event salad. Carrot salad is a perennial hit in my household and formed the original inspiration for this layered pita sandwich, but I have to admit, it was nearly overtaken by a new favorite I discovered while developing this recipe: edamame hummus. Hummus. Made with edamame, you guys.This simple twist on classic hummus is lighter and fresher than the original, and takes on the kind of pretty, delicate green hue that always inspires wonder and hunger in me simultaneously. Edamame hummus is the kind of easygoing side dish that will happily play with flatbread, crisp raw vegetables, fancy crackers, and just about anything else you'd care to pair it with. All things being equal, I'd recommend a spoon. :)


Garlic Chicken Pitas with Edamame Hummus, and Carrot Feta Salad
Makes 4 servings

For marinated chicken:

1 lb. boneless chicken breasts
1 tablespoon olive oil
1 tablespoon freshly squeezed lemon juice
1 teaspoon lemon zest
1 garlic clove, smashed and minced
1 teaspoon dried oregano
¾ teaspoon salt, divided
Freshly ground black pepper

For carrot feta salad:

3 large carrots, peeled and grated
1 tablespoon olive oil
1 tablespoon lemon juice
1 teaspoon honey
3 teaspoons flat leaf parsley, chopped (divided)
1 tablespoon feta, crumbled

For edamame hummus:

8 oz. shelled edamame (frozen)
3 tablespoons olive oil
2 tablespoons lemon juice
1 garlic clove, smashed and minced
¼ cup water
¼ cup tahini
4 pitas, or other flatbread of choice

Preheat oven to 350 degrees, arrange chicken breasts in roasting pan. In a small bowl, whisk together one tablespoon olive oil, one tablespoon lemon juice, one garlic clove the dried oregano, then drizzle this dressing over chicken and finish with a sprinkle of salt. Bake for 20 minutes, or until chicken breasts are done. Remove, season lightly with pepper to taste, then set aside to cool. Once chicken has cooled for about ten minutes, cut into ½” slices for serving.


Place grated carrots in a bowl, pour 1 tablespoon olive oil, one tablespoon lemon juice and one teaspoon honey over them, toss well with a fork. Sprinkle ¼ teaspoon salt, 1 teaspoon parsley and all of the crumbled feta over carrots, toss once more with a fork.

Heat a good amount of salted water to boiling in a medium saucepan, add edamame and boil for 5 minutes, then strain and place in bowl, set aside to let cool. Once cool, place edamame in a food processor with minced garlic clove, ½ teaspoon salt, 2 tablespoons lemon juice, lemon zest, 2 teaspoons parsley, ¼ cup water and tahini. Puree until a smooth paste begins to form, then drizzle in the remaining three tablespoons of olive oil and continue to blend until the oil is absorbed.


To assemble sandwiches, spread a heaping tablespoon of edamame hummus on each pita (or inside, if using pitas pocket-style), top with slices of chicken and another heaping tablespoon of carrot feta salad. Fold, eat, and enjoy!

SWEET LEMON BISCUITS, Y'ALL


Photos: Ten22 Studio
I need to be the first to point something out: I have no biscuit-making pedigree in my heritage. There's no familial biscuit recipe handed down in grandmother's shaking hand, no secret ways, no bygone biscuits that I can recall at all, really.
But I love them.
Buttery and flaky, soul-redeeming when they're perfect but honestly great even when they're crumbly, served savory to mop up streaks of gravy or just-so sweet and dolloped with rich lemon curd.....man, do I love me some biscuits. Do you need to have biscuits in your bloodline in order to make them properly? Purists are going to tell me yes, but even still, I don't know. Certainly my biscuits aren't Southern-grandmother-perfect. My people aren't Southern at all, but British--maybe my biscuits have a touch of the scone about them, instead--so these may be cultural anomalies, but they're fantastic alongside a hot, steaming cup of morning coffee, or a tall glass of iced tea. Lightly sweet and kissed with fragrant lemon flavor, the rich pistachio glaze on top is all the sugar you need (plus maybe a little bit extra).
Photos: Ten22 Studio
Just so you know: I'm not a huge fan of most pictures of me. Unless they're taken by a freakishly gifted professional, as these were. Most of the gorgeous photography in this post was shot by my friend, the very talented Rennai Hoefer of Ten22 Studio (she has since blogged the rest of the photos from this shoot, and they're all just as delicately stunning), in an equally gorgeous kitchen borrowed from Heather Kinkel (aka The Birdiegirl Co.). It takes a village to produce a lovely batch of biscuits, people. Rennai and Heather made me feel like a downright domestic goddess that day, and in gratefulness to them, I share my biscuit recipe from that day with all of you. Go forth, blog friends, and bake these for the ones you love. ❤️

Photo: Sweet Laurel


Sweet Lemon Biscuits with Pistachio Glaze
Makes a dozen small biscuits
For the biscuits:
2 cups all purpose flour
1 tablespoons baking powder
¼ teaspoon baking soda
½ teaspoon salt
1/2 cup white sugar
4 tablespoons unsalted butter (very cold, ideally you should place it in the freezer for 20 minutes first)
1/2 cup of milk
zest from 1 small lemon
2 tablespoons lemon juice
For the glaze:
2/3 cup chopped pistachios
1 1/2 cup confectioner's sugar
water
salt (optional)

Preheat oven to 425 and line a baking sheet with parchment in preparation. In a large mixing bowl, sift together flour, baking powder, baking soda, salt & sugar. Using the large holes of a cheese grater, grate cold butter into the dry mixture. Work the mixture with your fingertips until everything becomes coarse and crumbly, then STOP! Add milk and work the mixture a little more with your hands until a shaggy dough forms. Add lemon zest & juice, work it gently into the mixture, then gather the dough in a loose ball and place it on a working surface (a clean, lightly floured countertop or another piece of parchment works here).

Pat dough into a shape roughly one inch thick, then--using a small biscuit-cutter or my favorite method, the drinking edge of a glass*--cut out biscuit shapes and place on prepared baking sheet. Bake at 425 for about 12-15 minutes, or until lightly golden. Remove and let cool thoroughly.

( *My 'biscuit-cutter' is a small glass that cuts shapes about 2 1/2" inches across. Yours may vary slightly)

To make the glaze, place 1/3 cup pistachios (setting aside the other 1/3 cup for now) in a food processor and pulse until they are as finely ground as possible. Add confectioner's sugar, then water in small amounts. I like to start with a tablespoon and blend until a slow, runny honey-like consistency is achieved, adding a few drops of water here and there as needed. Add a pinch of salt if using unsalted pistachios. Spread on the tops of your cooled biscuits and sprinkle with the remaining chopped pistachios.